

Saturday 15 January 2011

Click on the tag to view the animation.
Electrifying
Tutorial written by and © to Bits N Bobs 15th January 2011
You are not allowed to share/forward or translate this tutorial or place it on any blog or website.
This tutorial is written from my own ideas and any similarities to any other tutorial is purely coincidental.
Tutorial is for those with a working knowledge of paintshop pro.
Supplies needed.
Font of choice for your name.
I am using BeauRivageOne
Tube of choice , I am using Natalie by Bits N Bobs
Artwork is not to be used without using the correct copyright info included with the tube
Alien Skin Xenofex 2 - Electrify
My supplies here
Note
For the animation you will need animation shop.
This tutorial was written in PSP 9
Open all other supplies in paintshop except the font.
Double click on your font and minimize.
1. Open a new file 600 x 250
Re-size your paper to 620 pixels wide copy,
paste as a new layer.
2. Copy element 40, paste as a new layer,
position to the left, duplicate layer.
Image/ mirror, layers/ arrange/ move down.
Duplicate layer,
Layers/ arrange/ move down.
Effects/ texture effects, mosaic antique
using the settings as in the screenshot below.

Duplicate layer, layers/ arrange/ move down.
Layers/ merge/ merge down.
Rename this layer to 1.
Duplicate layer, rename this layer to 2
Duplicate layer, rename this layer to 3
Duplicate layer, rename this layer to 4
3. Activate the layer named 1,
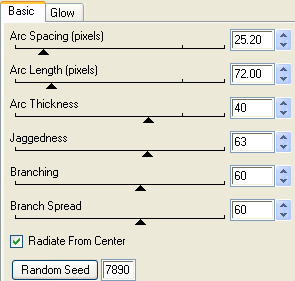
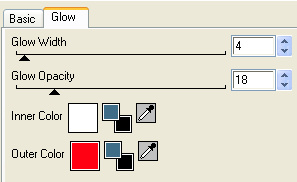
Effects/ Plugins/ Alien Skin Xenofex 2/ Electrify
Adjust the settings as per the 2 screen shots below.
Activate the layer named 2,
Effects/ Plugins/ Alien Skin Xenofex 2/ Electrify
Same settings as before but it the random seed once.
Activate the layer named 3,
Effects/ Plugins/ Alien Skin Xenofex 2/ Electrify
Same settings as before but it the random seed once.
Activate the layer named 4,
Effects/ Plugins/ Alien Skin Xenofex 2/ Electrify
Same settings as before but it the random seed once.
4. Activate top layer
Copy the larger of your tubes,
paste as a new layer, image/ mirror.
Position to your liking.
Add a drop shadow.
I use H3, V3, O100, B9.00, C#000000
Copy your smaller tube,
paste as a new layer, position to your liking.
Change the layer blend mode to Screen.
5. Copy your wordart, paste as a new layer.
Position towards the top so you have room for your name underneath.
Change te colour if you want to.
I am leaving mne as white.
Add your copyrigt info.
PLEASE NOTE:
If you do not wish to animate layers/ merge/ merge visible
Add your name and save.
ANIMATION
6. Close layers 2, 3 and 4, edit/ copy merged.
Open Animation shop, paste as a new animation.
Back to psp, close 1 and open 2, edit/ copy merged.
Back to Animaton shop, edit/ paste after current aimation.
Back to psp, close 2 and open 3, edit/ copy merged.
Back to Animaton shop, edit/ paste after current aimation.
Back to psp, close 3 and open , edit/ copy merged.
Back to Animaton shop, edit/ paste after current aimation.
7. Create your name in paintshop as normal, copy the file and paste as a new animation into animation shop.
Activate your animation, edit/ select all, edit/ propogate paste, edit/ paste into selected frame and then file/save as.
Subscribe to:
Post Comments
(Atom)
Stores


BNB Blinkie


0 comments:
Post a Comment