

Sunday 11 November 2012


The Flasher
Tutorial written by and © to Bits N Bobs 11th November 2012.
Results are for personal use only.
No monetry gain allowed and that includes placing them behind a paid or donation based membership area.
You are not allowed to share/forward or translate any of my tutorials or place them on any blog, website, DVD or anywhere else without my permission.
These tutorials are written from my own ideas and any similarities to any other tutorial is purely coincidental.
All tutorials are for those with a working knowledge of paintshop pro.
I reserve the right to amend these terms at any time.
Supplies needed.
Font of choice for your name.
I am using Roundy
Tube of choice.
I am using one by Nicholas Garton
Mine is Mirror and available at UpYourArt
Tube is not to be used without the correct licence.
Flash Spark animation by Missy
Plugins needed.
AAA frames photoframe
Note
This tutorial was written in PSP 9
and uses animation shop 3
Double click on your font and minimize.
Install your plugin.
Open a new image, 600 w x 250 h at 72 dpi.
1. Flood fill with a colour from your tube.
I am using #f0b7bb
Copy the bottom layer of the tube.
Paste as a new layer.
Image/ rotate/ free rotate/ left 90
all layers un-tabbed, rotate single layer un-tabbed.

Effects/ reflection / kaleidoscope

2. Copy the bonus tube layer.
Paste as a new layer.
Position so most of her top half is in view.
Add a drop shadow of choice.
I am using H0, V0, O100, B9, colour #000000
Edit/ Copy.
Effects/ Distortion Effect/ Wind
Direction From Left, Strength 100.
Position to the far right hand side.
Layers/ duplicate, Image/ Mirror
Layers/ merge/ merge down.
3. Edit/ paste as a new layer.
Position to the far right with the camera being
the main focus.
Layers/ Merge/ Merge visible.
Effects/ Plugins/ AAA Frames/ Foto frames.
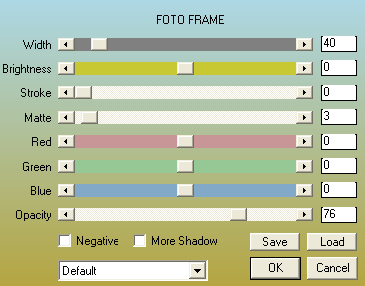
Effects/ Plugins/ AAA Frames/ Foto frames.

4. Copy the main tube layer
and paste as a new layer.
Image/ Mirror, position to the far left.
Top half in view with the top of her
head out of view.
Add a drop shadow.
I am using H3, V3, O100, B9, colour #000000
5. Layers/ Merge/ Merge Visible.
Add all copywrite info.
*** Note:
Save now or continue for the animation steps
*** End note:
6. Edit/ Copy merged,
Open animation shop,
Edit/ Paste as a new animation.
Edit/ paste after current frame.
Continue pasting after current frame until you
have a total of 6 frames.
Open your animation.
Edit/ Select all.
Activate you 6 frames again.
Edit/ Select all, paste into selected frame.
Position so the center of the flash is over
the large camera lens.
Go back to your animation.
Edit/ Select all.
Animation/ Animaton re-size to 50%
Activate your main image.
Edit/ select all, edit/ propogate paste, Edit/ Paste into selected frames.
center of flash over the small camera lens.
7. Open a new image 150 x 150 for your avatar.
Edit/ Copy, Edit/ paste after current frame.
Continue pasting after current frame until you
have a total of 6 frames.
Activate your animated signature,
animation/ re-size to 80%
Edit/ select all.
Activate your avatar, Edit/ select all. edit/ propogate paste,
Edit / paste into selected frame.
8. Create your name or Initial in paintshop as normal, copy the file
and paste as a new animation into animation shop.
Copy the name in animation shop, activate your sig or AV,
Edit/ select all, edit/ propogate paste, edit/ paste into selected frame.
Repeat this for any copywright you haven't yet added and then file/save as.
Subscribe to:
Post Comments
(Atom)
Stores


BNB Blinkie


0 comments:
Post a Comment